
Precision Piecing for Lazy Quilters: Part 3
- Apr 30, 2022
- 8 min read
Updated: Nov 25, 2025
This month's post is all about pressing for maximum precision. You can cut and sew super accurately, but all those efforts can be undone if you’re not careful while pressing. However, there’s more than one way to achieve accurate pressing. In this post, I’ll discuss your options and things to consider for each, as well as some of what I consider non-negotiables.
FYI: This post is part of a monthly series on precise piecing. If you haven't read Parts 1 and 2, make sure to check those out first. There's lots of good information for easy ways to cut and sew more accurately, as well as some ground rules. My goal is to show some easy habits that you can implement to up your quilting game and ultimately make quilting more fun. Also, if you aren't already subscribed to my newsletter, make sure you sign up at the bottom of this page so you don't miss next month's post!
Contents:
The Non-negotiables
There are a couple of habits that I consider essential for precise piecing. Precise pressing basically boils down to minimizing stretching. While the rest is up for hotly contested debate (and mostly a matter of preference), it is extremely difficult to get precise piecing without these non-negotiables.
Cotton Thread
While a lot of quilters recommend cotton thread because it’s a natural fiber, my use of it is purely scientific. Polyester threads stretch far more easily than cotton threads (they have a lower elastic modulus). What this means for your sewing is that poly threads will result in a stretcher seam than the same seam sewn with a comparable cotton thread (check out the video below for a great visual of this).
While this is helpful when sewing garments or other stretchy fabrics (or when it comes to actually quilting your quilt top) when trying to do precise piecing, the last thing you want are things stretching since you’ve just spent so much effort making sure things are a certain shape and size (cutting and sewing accurately). By always using a cotton thread while piecing, you give yourself the best possible chance of preserving all the precision work you put in thus far.
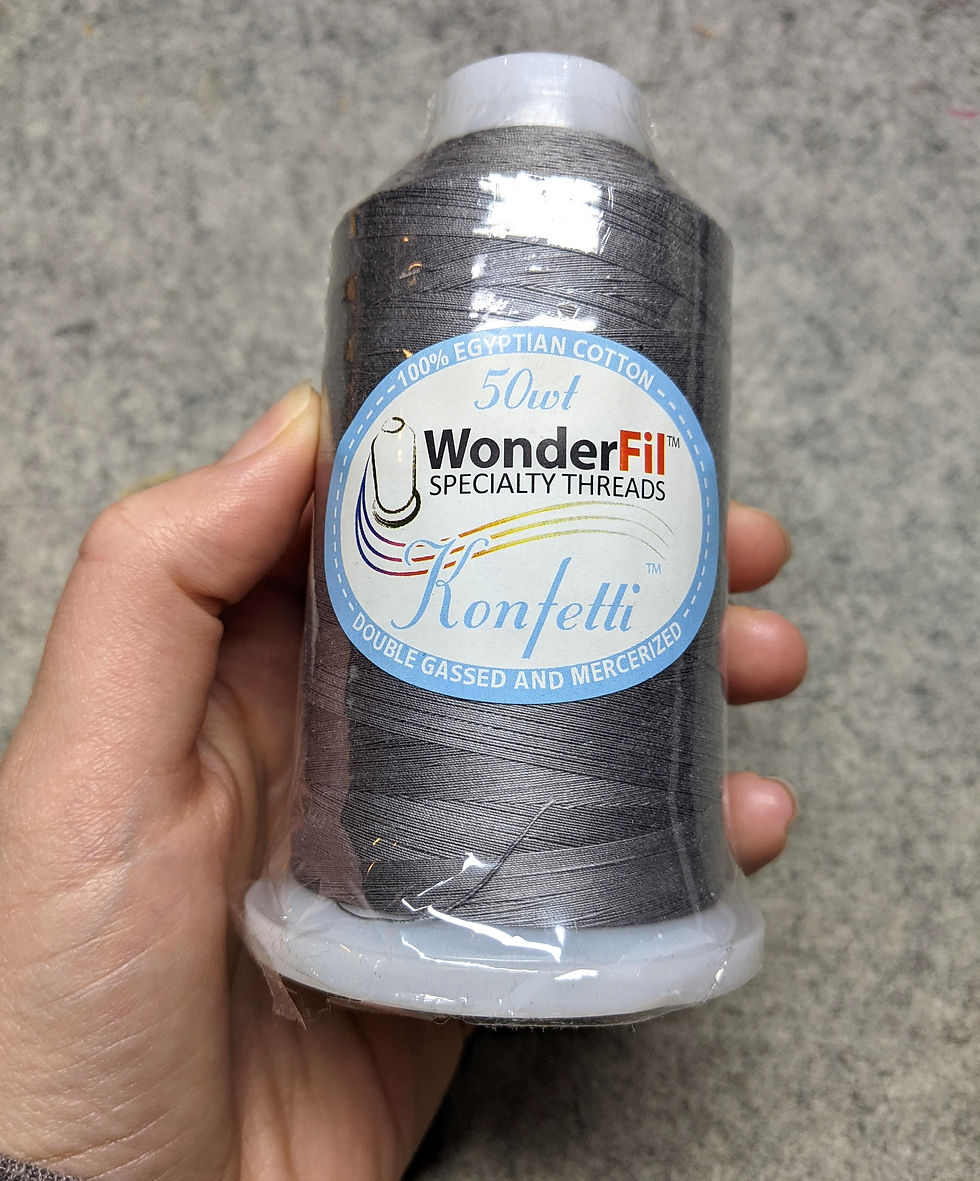
My favorite piecing thread is Konfetti cotton by Wonderfil Specialty Threads. It’s a 50 wt 3-ply double-gassed, mercerized Egyptian cotton thread. I’ll save the explanation of what all those terms mean and why they’re important for later, but suffice it to say, it’s a relatively thin, low-lint cotton machine sewing thread. The important part of that description is that it is thin and low lint. Neither of these directly contributes to more precise piecing, but they do help with your overall enjoyment. The thinness helps achieve flatter seams which makes the top easier to quilt and the low lint means I don’t have to clean my machine nearly as much and is just kinder to my machine in general.
The one time that your thread choice can affect your precision is if you don’t calibrate your ¼” seam to the thread type you’re using. As you heard last month, the thicker the fabric and thread you’re sewing with, the scanter you will need to make your seam allowance. This is why it’s easiest to just pick one thread to use for piecing and always use that same thread. If you have to change threads, make sure to recalibrate your scant ¼” and try to do it in between projects rather than during a project. Trying to intersect seams that have different amounts of bulk can get really tricky.
Now I know A LOT of quilters are really big fans of Aurifil cotton thread. To see what all the buzz is about, I gave it a test drive. You can see how it stacks up to Wonderfil here. The result might surprise you. It certainly surprised me! Regardless of what you choose to use, just make sure you're using quality cotton thread.
Pressing, NOT Ironing
This might seem like a small distinction, but it actually makes a huge difference! Pressing is an up and down motion. You set the iron down on the seam for a few seconds, then pick it up and remove it. (Ok, you can wiggle slightly if it makes you feel better, but resist smoothing it over the fabric at all costs!)
On the other hand, ironing involves scooting the iron along the fabric in a side-to-side motion.
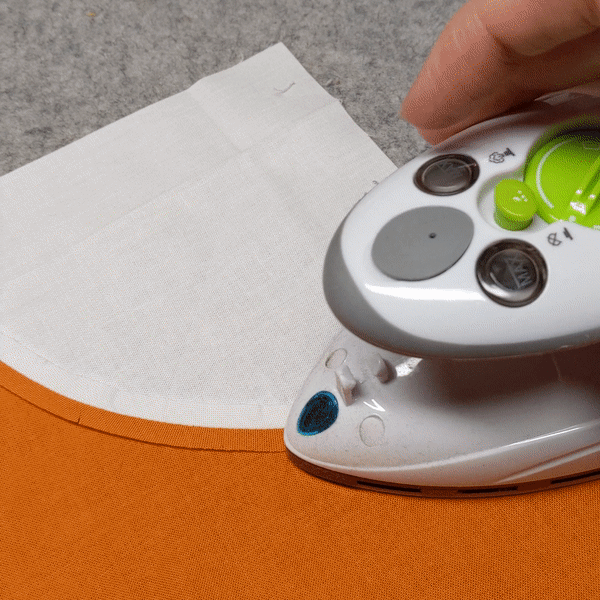
Why is the important? Because when fabrics get hot, they get soft (especially if you’re using steam). That’s the purpose of an iron in the first place; heat softens the fabric to allow the fibers to be fixed in a specific direction. However, this also means it also has the power to distort fabrics and seams if not used carefully. By pressing, you avoid the risk of distorting things as you set the seam allowances.
Your options
Now that we’ve covered the basics, let's talk about your options when it comes to pressing and how those could affect your precision.
Open vs. to the Side
This is maybe the most hotly contested topic in quilting (aside from prewashing). I’m solidly in the pressing open camp and here’s why:
When you press seams to the side, it is all too easy to accidentally push the seam more towards one piece than the other. This artificially shortens the piece the seam is pressed away from resulting in distortion to otherwise precisely cut and pieced units.

By pressing my seams open, I put the seam directly in the middle of a tug of war helping to ensure that it stays evenly in the middle of the two pieces; neither half gets artificially shortened and my pieces stay precise.
Now, that doesn’t mean you can’t achieve precise piecing when pressing seams to one side. You can, you just have to be a lot more careful to make sure each fabric gets fully extended and things are even. I never developed the knack for this and no matter how hard I try, I still can’t do it reliably, so I stick with pressing my seams open.
How do you check to see if you’re accurate when pressing your seams to the side? The very same way you calibrate your scant ¼” seam allowance. Check out this post to see how that’s done. If you find that the accuracy of your calibration piece depends on which direction the seams are pressed, it’s because your seam isn’t getting fully extended and thus isn’t staying in the middle of your pieces. Adjust your technique accordingly or give pressing seams open a try. You will probably notice a world of difference.
Now there’s a really big elephant in the room that I haven’t addressed which is that pressing seams open weakens the seam. While I don’t doubt that this is true, I have never had an issue with my seams splitting as a result and that’s saying something because all my quilts get put through the wringer. I machine wash and dry all my quilts on normal or heavy settings all the time because to me, quilts are meant to be used and abused. In all of that, not once have I had an issue with a seam splitting and I have had some of my quilts for 15+ years. That’s probably in part due to the fairly dense quilting I like to put on all my quilts, but suffice it to say that, as long as you are using good quality thread and quilting it at least as densely as the batting recommends, the part that will wear out first is probably not going to be your open seams (more than likely, it will be the binding or the fabrics themselves).
There is also a myth that stitching in the ditch on your open seams will result in thread breakage. This is categorically false. Modern threads are strong, and we sew over them all the time (backstitching, over-stitching when quilting, or when interlocking seams while piecing a quilt top). None of those things result in breakage so why would they result in breakage when stitching in the ditch?
Getting Steamy
Using or not using steam is more a matter of getting flat seams than it is getting precise seams. But if you decide to use it, not being careful can ruin your precise seams. Like the heat of an iron, steam further softens fabrics making them even more susceptible to distortion. If you’re using steam (and I do, I love it!) it is extra important to press and not iron because you can severely distort your fabrics otherwise.
To avoid distortion, always let your fabrics cool for a few seconds after removing the iron before moving or bumping them. If you pick them up while still soft and a little damp from the steam, they can stretch. If you’ve ever noticed your otherwise flat piece getting wavy after ironing, that’s what’s happening. For extra insurance, use a tailor’s clapper (a long block of unfinished wood) to more rapidly cool your fabrics while keeping everything nice and flat before picking up your fabric and moving on to the next portion of the seam. A few seconds is all it takes.

Other Pressing Tools
In addition to a clapper, there are a few other tools that many quilters recommend to help with ironing. All of these things I find helpful, but don’t directly contribute to precise piecing. Here are my favorites and why I like them.
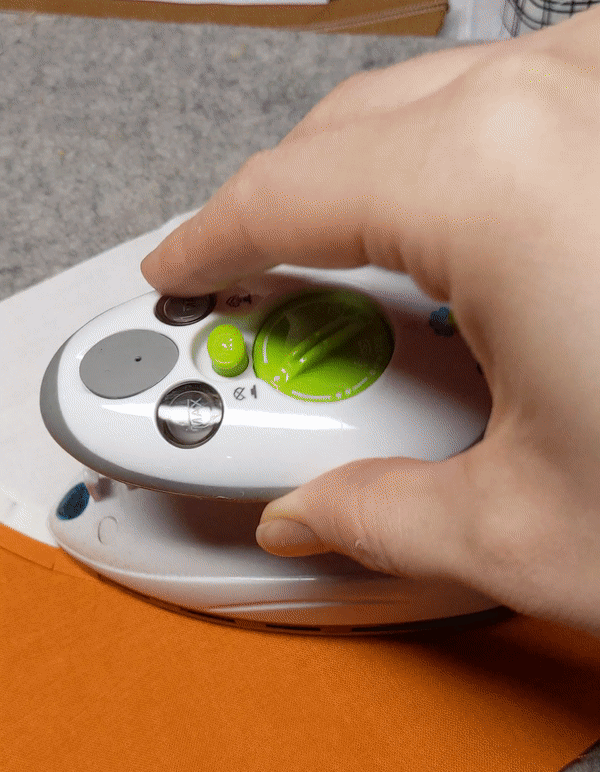
Seam roller – A seam roller is a wood or plastic wheel that is used to pre-press a seam before you iron it. This is the one I used. Now I know that sounds like an extra step and very un-lazy quilter-like, but I find it really helpful all the same. A seam roller allows me to open my seams quickly and easily before I apply any heat which removes the risk of burning my fingers. This makes pressing open go much faster which is the #1 complaint I hear from quilters when I suggest pressing open. It also allows me to make sure that the seam gets fully extended before I permanently set it with heat and steam (yeah, you can press it back the other direction, but those creases never completely come out after something has been pressed with steam). This is the one I use.

If you don’t want to seam roll, there are a couple of other tools that are helpful to make pressing seams open easier without burning your fingers. These fingertip silicone oven mitts will allow you to manipulate your seams while very close to your steaming iron without burning yourself. This silicon stylus does basically the same thing but keeps your fingers even further away from the iron. I don’t use either because seem rolling allows my seam to stay open enough to press without getting my fingers involved at all, but they’re good options if you’re having trouble.

Wool pressing mats – A wool pressing mat is a thick felt pad that is used to iron in rather than an ironing board. Again, I find that this doesn’t directly contribute to more precise piecing, but I still love mine. This is mostly because I quilt in a small space and it prevents the need for having an ironing board or mat set up at all times, but I also like that it’s a little sticky. The felt grabs onto your fabric holding it in place much like a design wall surface or cotton batting grips your quilt top and that makes pressing go even faster. Just make sure you put a plastic barrier or ironing pad down below the wool mat if you’re sewing space has a wood bench (mine is plastic so I just iron directly on the mat on top of my sewing table). The steam and heat can warp the wood.
That’s it! Those are my surefire tips for making sure you don’t undo all your precision piecing efforts during the pressing step. Once you develop a few specific habits, precision piecing is smooth sailing. Check back in next month for the final installment in this series. I’ll be covering alignment techniques to help make sure all your points match up.
Want to be notified when new posts go live? Sign up below to join my monthly newsletter. It's full of great quilting tips and tricks!


Comments